
GetGenie AI writing assistant helps you generate website content faster and easier. It does much more than just writing. From copywriting, long-form content writing to SEO assistance, GetGenie can be the full content writing assistant for your website.
Here is the way to get started with GetGenie. Follow the following steps when you are going to use the plugin for the first time.
How to Use GetGenie Ai Writing Assistant 👇 #
In order to use GetGenie Ai, you have two different options:
- Installing GetGenie WordPress Plugin
- Using GetGenie Playground
Read on to learn about both ways.
GetGenie Ai WordPress Plugin Explained #
Before getting started, you have to install the plugin on your WordPress site, then activate the credits with the license key, and get started with GetGenie Ai writing assistant.
Step-1: Install GetGenie Ai plugin #
There are three methods to install the GetGenie plugin on your WordPress site and claim the license.
Method-1: From Pricing Page #
From the pricing page, you will find free and paid GetGenie AI plans and install the plugin easily. To start, you have to visit the pricing page and follow the steps-
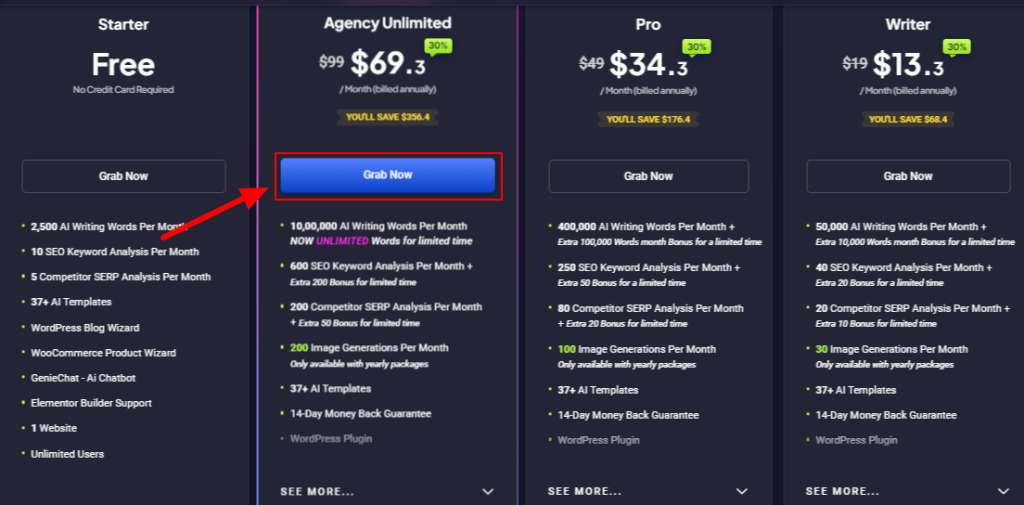
- Click the Grab Now button from any plan, for example-
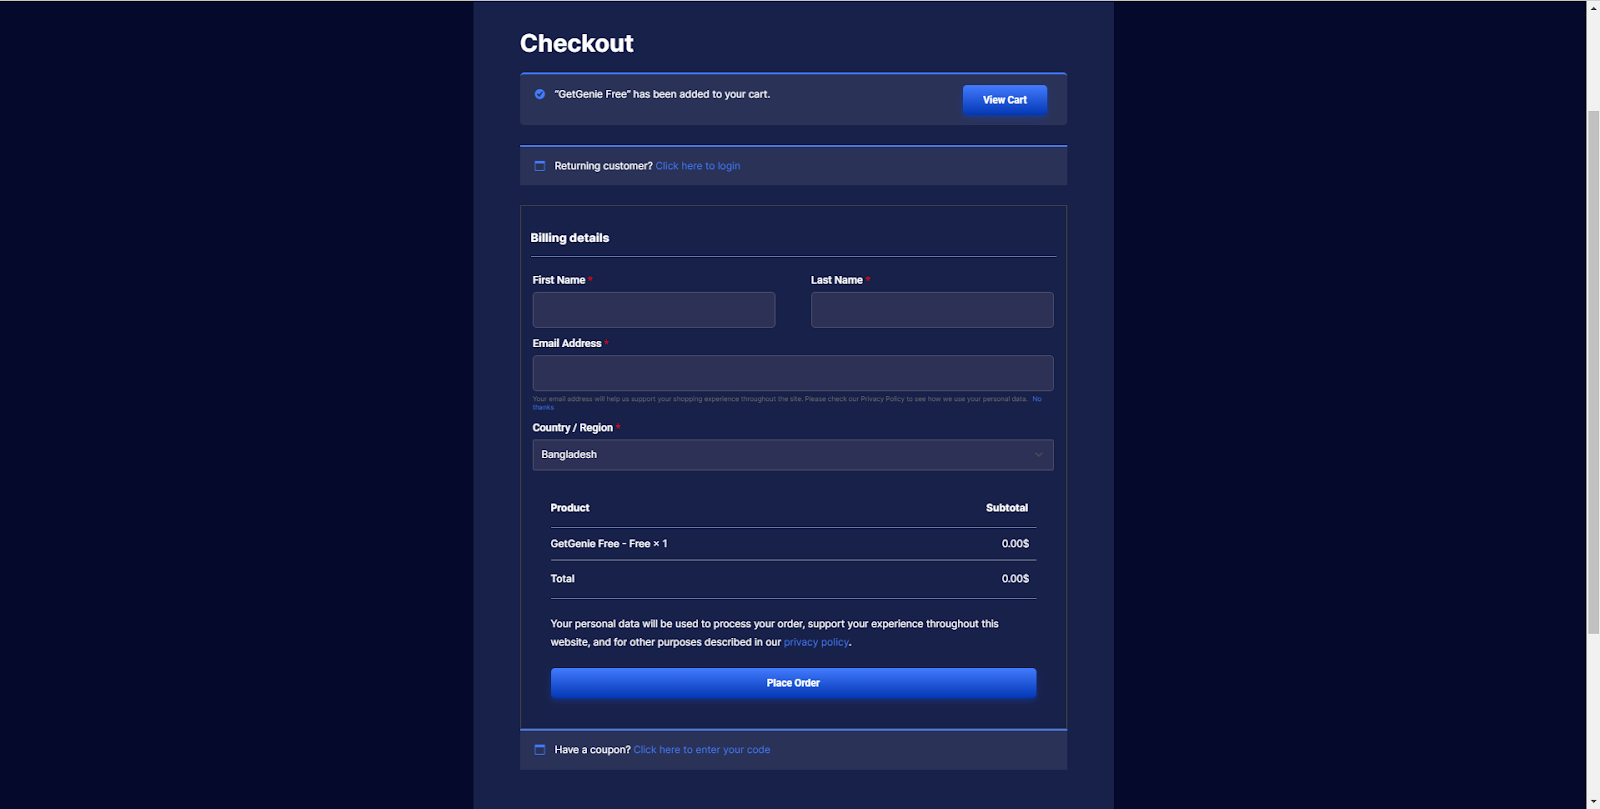
- Fill Out the form and place an order, it’s easy and fast
- Afterward, the Checkout page will show you the below page from where you can claim your license.
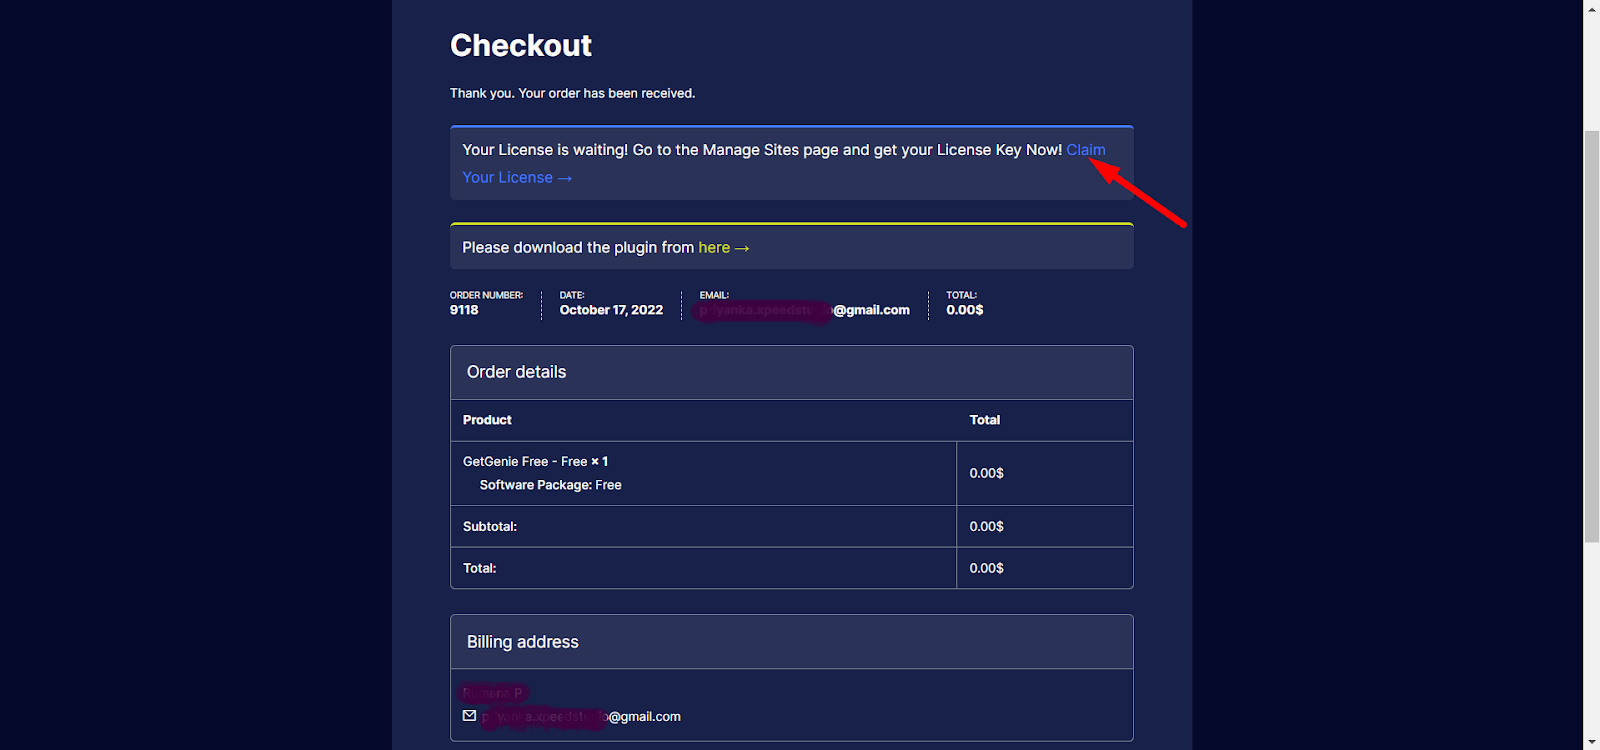
Now,
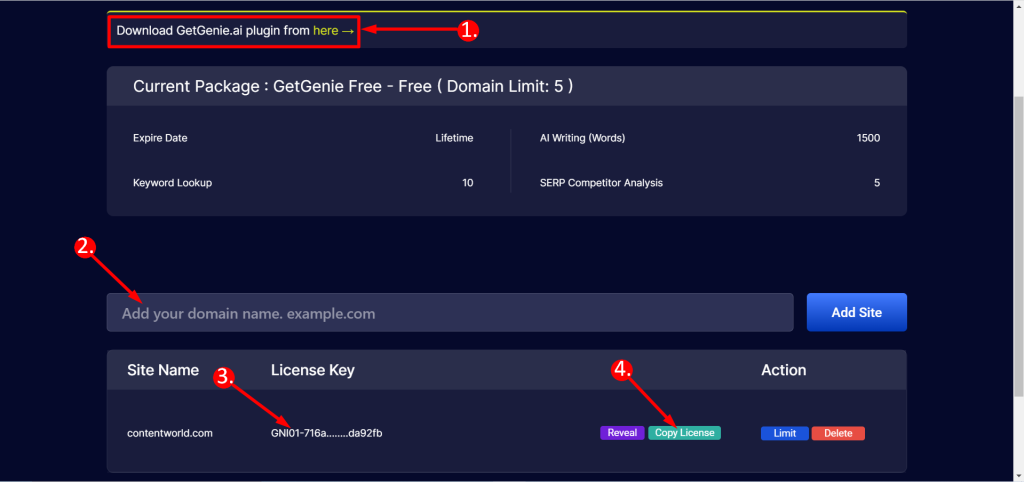
- You can see there is a link to download the plugin. Click and save the plugin from here.
- Add your domain name and your license key is ready.
- You have to just copy the key from here. Next, you will paste the key while doing the license settings from your dashboard (See Step 2).
Method-2: Install plugin from WordPress dashboard #
To install the GetGenie AI writing assistant plugin:
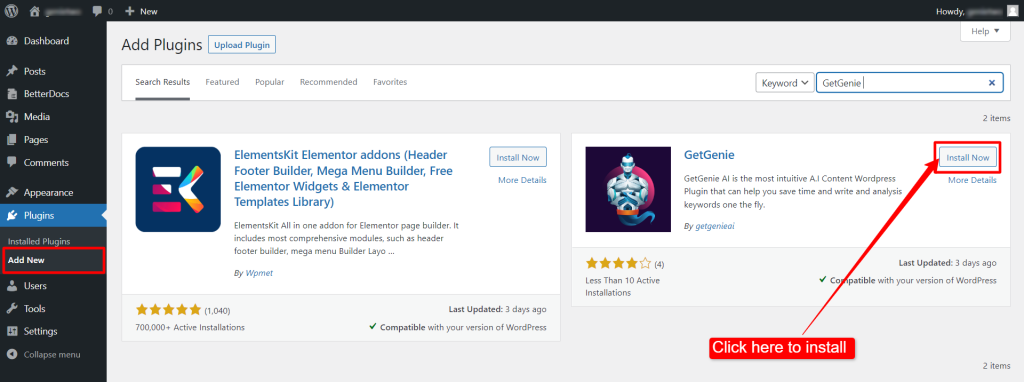
- Navigate to Plugins ➔ Add New from your WordPress dashboard.
- Search for GetGenie from the search bar.
- Then click on the Install Now button for GetGenie.
- Now, you have to click on the Activate button that appears once the installation is complete.
- Notice that, if you don’t have the license key then after clicking the Activate button you will see this message-
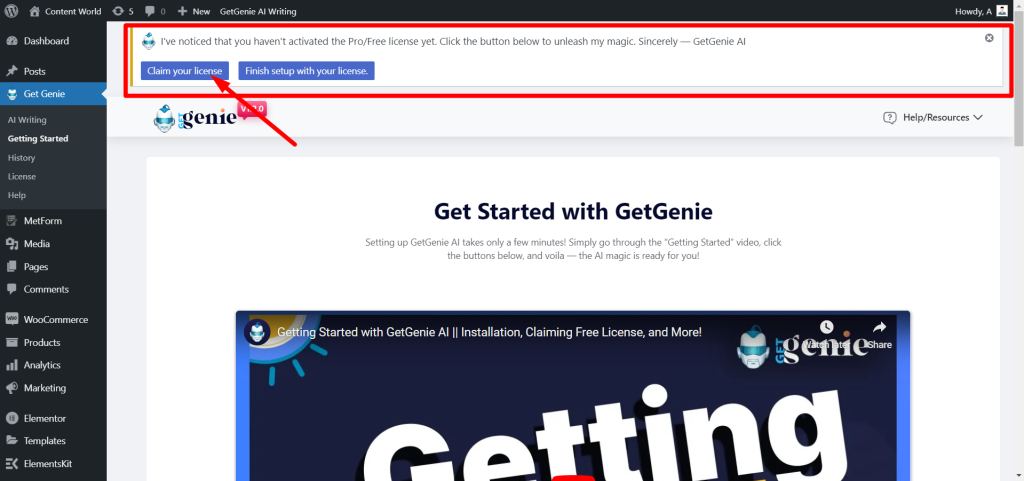
If you press the ‘Claim your license’ button it will take you to that checkout page and the license-claiming procedure is the same as before.
6. After getting the license key set it from license settings from your dashboard (See Step 2).
Finally, you will land on the dashboard of GetGenie. From there, you can use the plugin as your AI writing assistant.
Method-3: Find GetGenie Ai plugin in WordPress.Org #
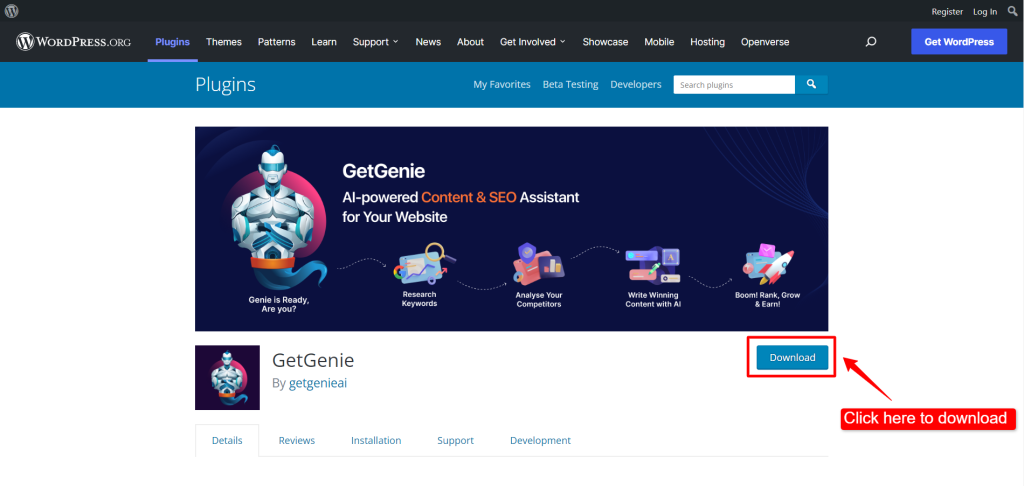
You can also install the plugin by uploading the plugin file. For that:
- Go to the GetGenie plugin page on WordPress. Org.
- Click on the Download button to download the plugin file.
Uploading plugin #
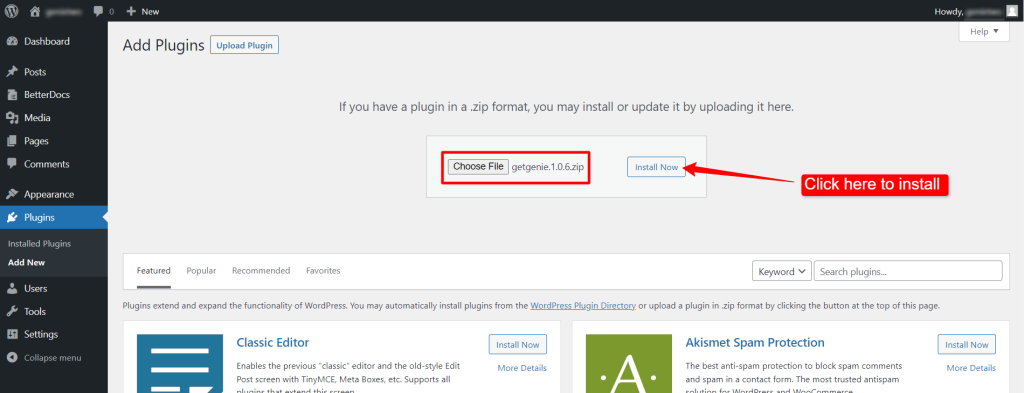
If you have downloaded the plugin then you have to upload it before activating. So, for Method-2 and Method-3 follow this steps-
- Now navigate to Plugins from your dashboard ➔ Add New ➔ Upload Plugin.
- Then upload the GetGenie plugin file (you previously downloaded). Then click on the Install Now button.
- Finally activate the plugin once the upload is done. But before that, don’t forget to claim your license and set it (follow Step-2).
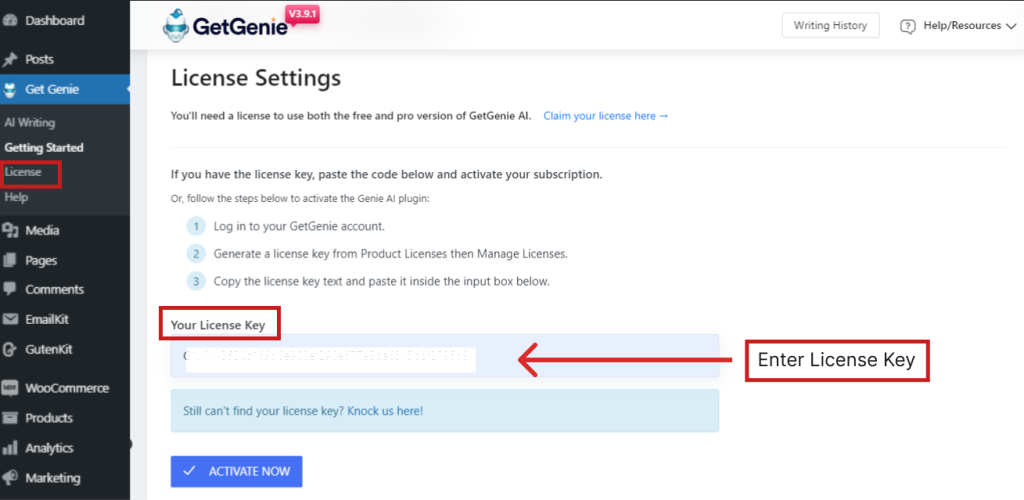
Step-2: Activate GetGenie with license key #
Before using the GetGenie AI, you must activate GetGenie credits with a license key. To activate the license key:
- Navigate to GetGenie ➔ License from your WordPress dashboard.
- Enter your GetGenie license key in the respective field.
- Click on the Active Now button.
However, if you directly land on the plugin License page and you haven’t claimed your key before then you can also click the “Claim Your License” button from the notification bar located at the top of this page. Doing so will take you to the GetGenie Ai website to grab the license.
Explore the AI writing assistant templates #
Now you are ready to experience all the features of GetGenie. This AI writing assistant comes with dozens of templates. To start using those templates, navigate to GetGenie ➔ Write for me. There you will see all the available templates for writing.
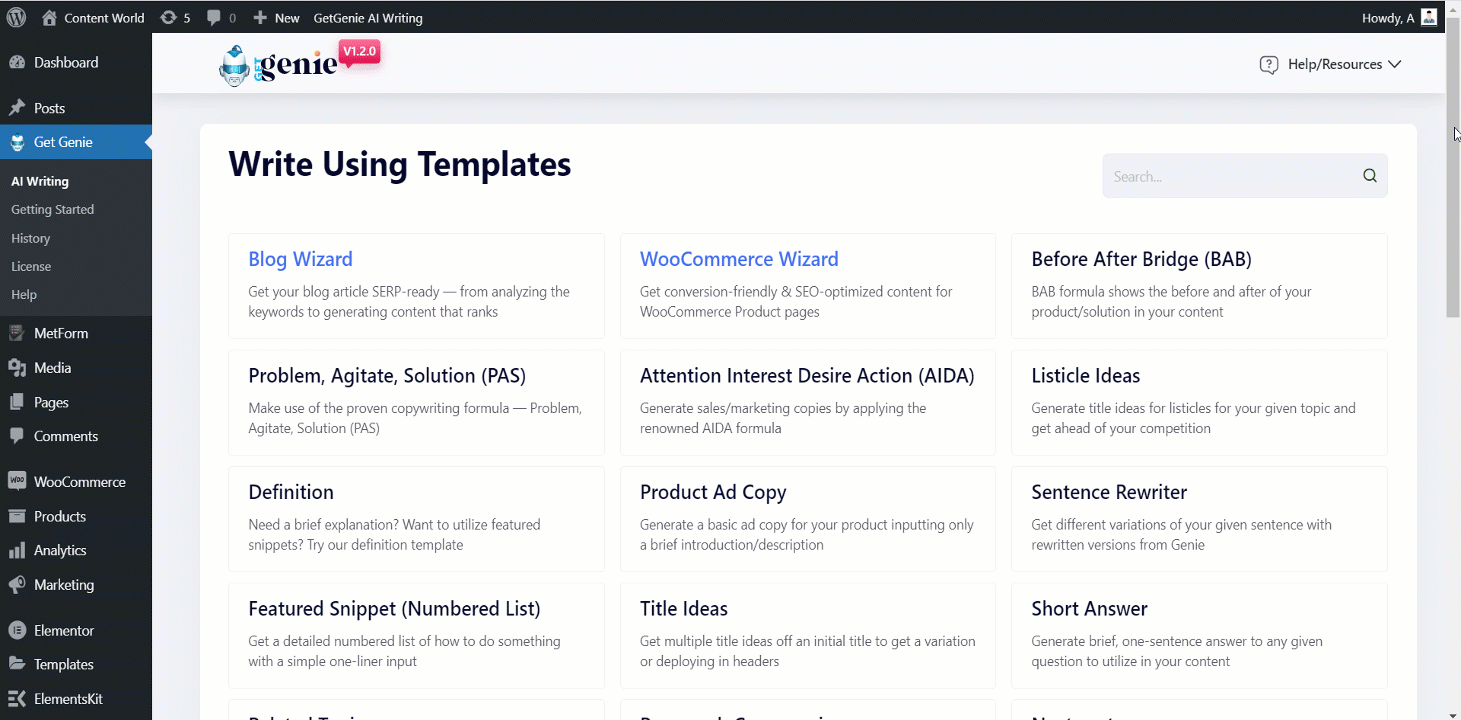
Choose any template from the list that you want to use. Click on the template and it will show you multiple options.
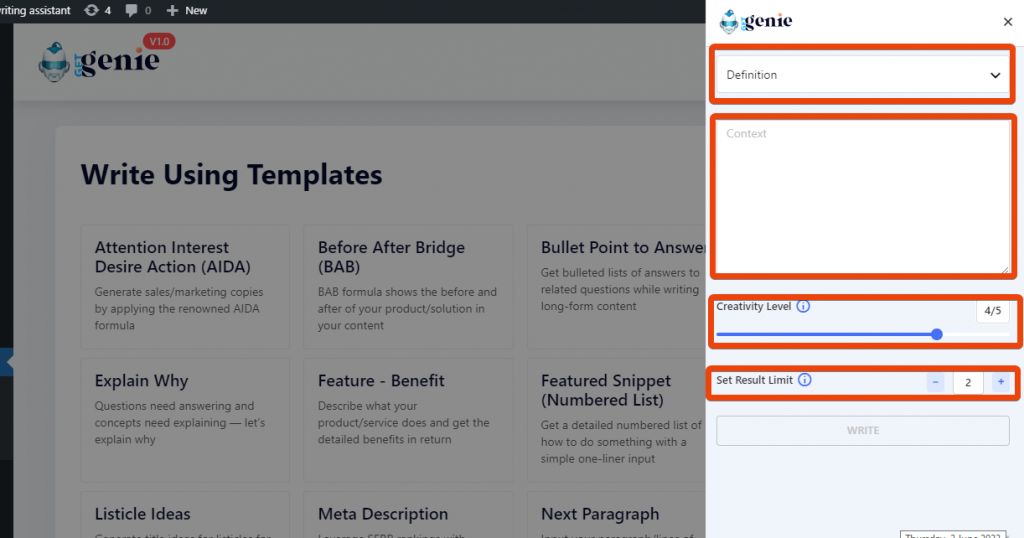
On a template interface, there is a drop list of templates, where you can choose a template you want to use. Then you will see the input fields. The input fields vary as different templates require different inputs.
Scrolling down on the template interface, there are options to set Creativity Level and Results Limits. These two attributes work as follows:
Creativity Level: Creativity can be set between one to five. With a lower creativity level, GetGenie will provide only information-based content with less creative inputs. While you can give creative freedom to Genie with a higher creativity level.
Set Results Limit: GetGenie gives you multiple versions of the same content. You can set how many variations you want for a content by setting a results limit.
The plugin will show you the results according to your command. Now from the generated results, you can choose any and click on it to copy.
How to write a new post with GetGenie inside WordPress dashboard? #
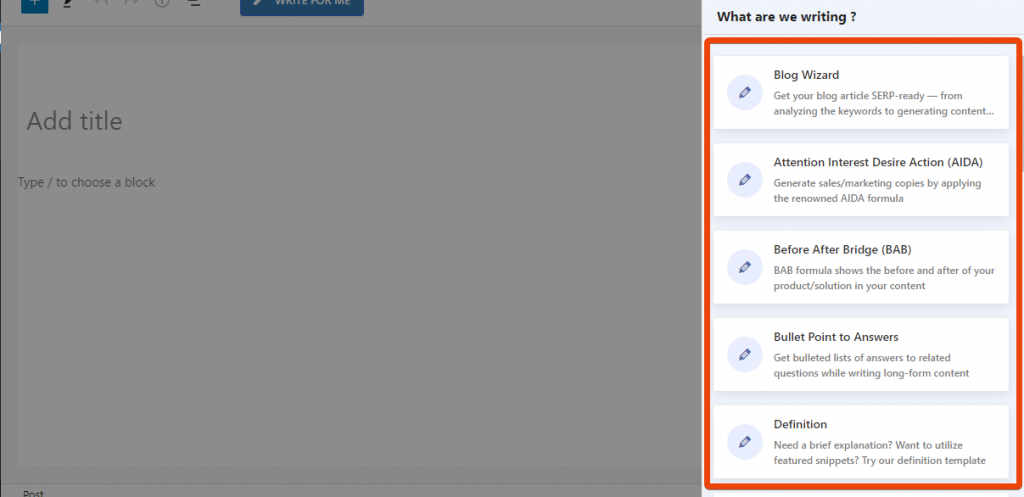
Using GetGenie, you can add content directly inside your WordPress post from GetGenie. For this, go to your WordPress dashboard ➔ Posts ➔ Add new. On the top, you will see an option named the ‘WRITE FOR ME’ button.
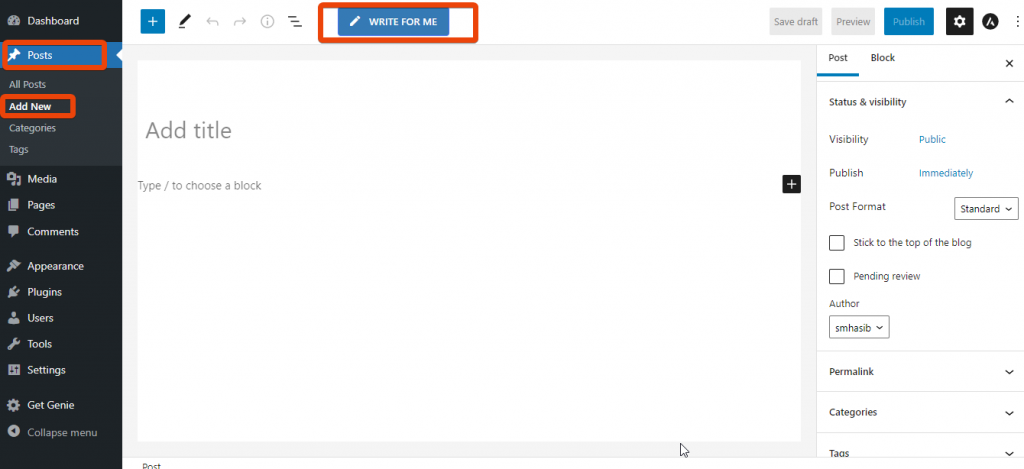
It will show you all the options to write new content. From the list, select the particular type of content and you can start writing.
For instance, here I have selected the Blog Wizard section to write the content. Here, you can generate Title, Intro, and Outline with this wizard. The features here are, keyword, creativity, and a number of generated content, etc.
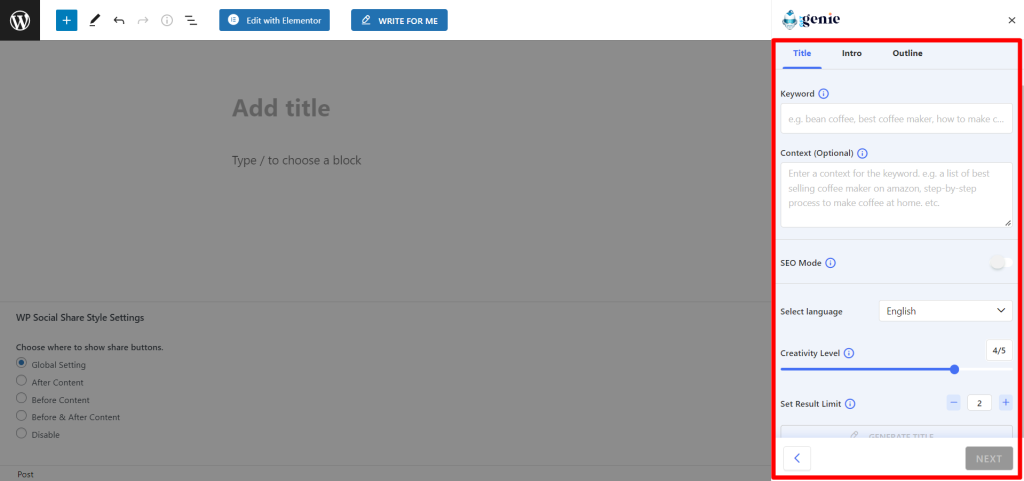
After generating a title you can generate the intro and outline based on the title. You can then insert the generated content into the post directly.
GetGenie Ai Playground Explained #
After successfully signing up for a GetGenie Ai package, you will see the popup below,
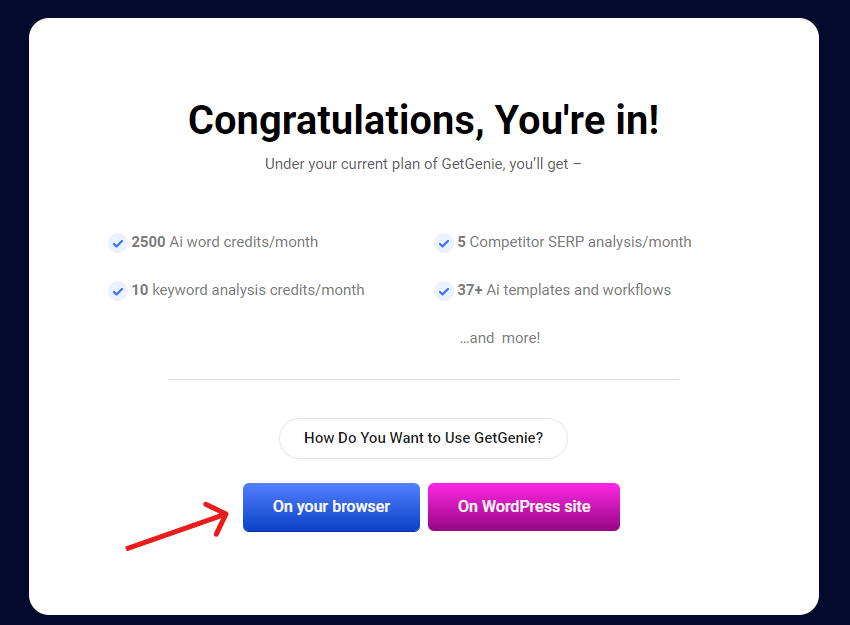
Click the “On Your Browser” button to access the GetGenie Ai playground.
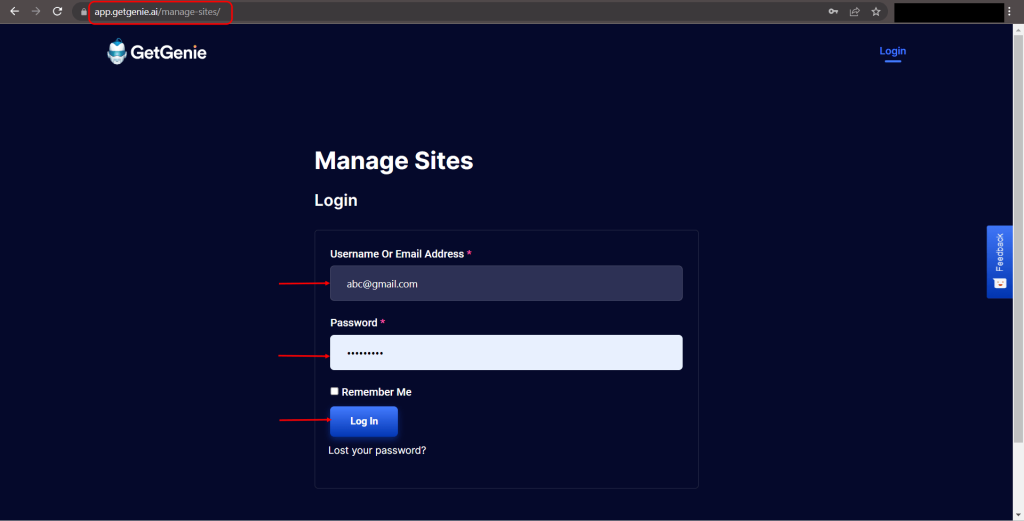
However, if you have already signed up with your WordPress website, visit this page and log in with your credentials.
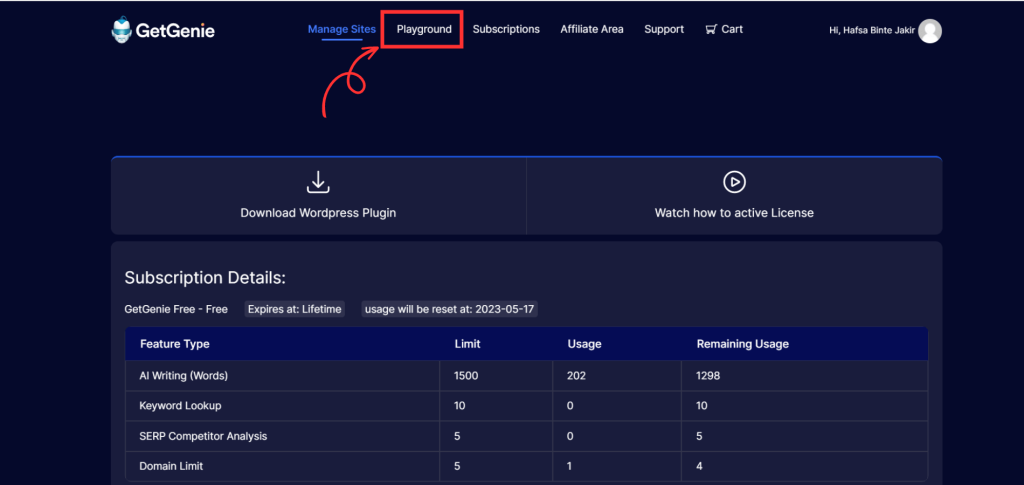
Now, click on the “Playground” from the top navigation menu to enter the GetGenie dashboard.
Once, you’re in the Playground screen, the first thing you will do in the dashboard is create a new file /document. For this, click the “New Document” button > Enter a document title > Hit the “OK’ button.
By default, the dashboard displays the “Blog Wizard” template.
Blog Wizard #
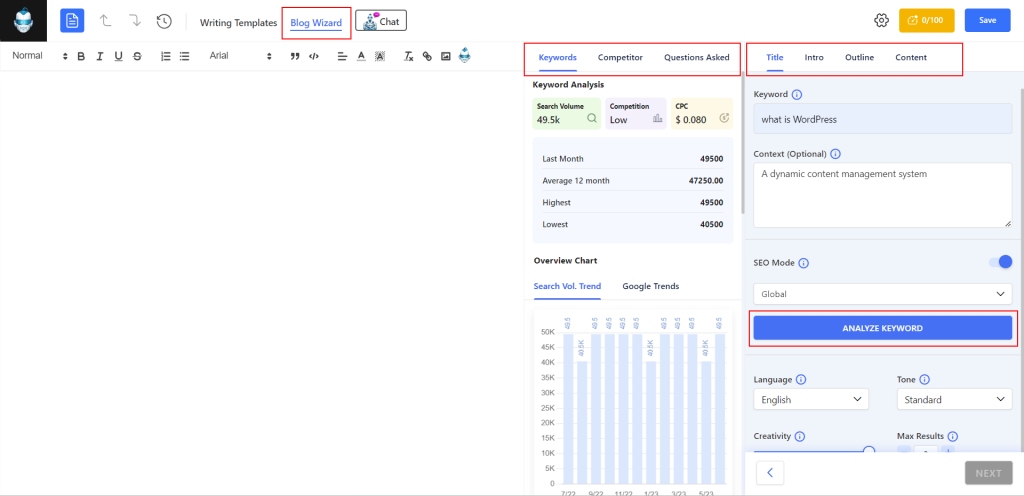
Blog Wizard is a robust assistant to write an entire blog post. You can generate a title and outline by putting a keyword and context. Then, you’ll create SEO-optimized content for each subheading or use the “One-Click Blog” feature to write the complete blog in no time.
GetGenie Ai Templates #
Select the Writing Templates button before the Blog Wizard option to reveal a list of GetGenie Ai templates on the right sidebar. There are templates for different purposes like writing blogs, product descriptions, or social copies.
Scroll up or down to choose your preferred template. Clicking on any of them will open the template settings. Here, you add a topic prompt and control the language, creativity level, and number of outputs. And, click the Write button to generate the output.
Navigate History #
Check all the actions you have done on the playground.
Undo/Redo Task #
To undo an action click on the (up arrow) icon and to redo an action click on the (down arrow) icon.
Content Score #
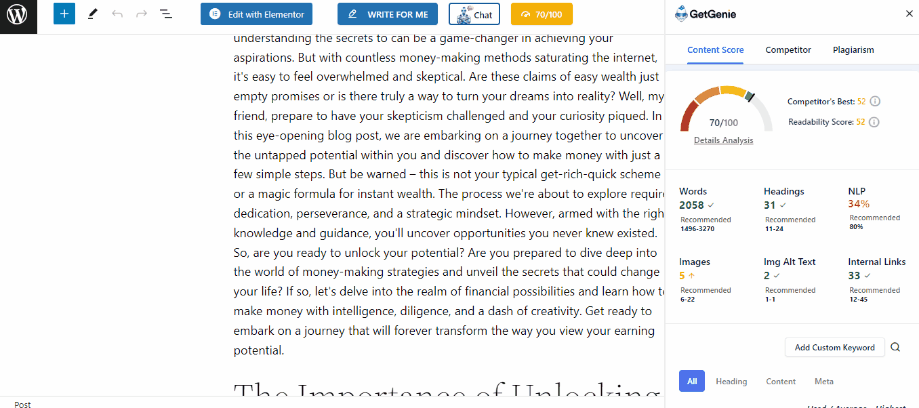
It will show the quality of your content based on a numerical value that ranges from 0 to 100. Further, clicking on this button will open up the recommended NLP, content analysis (words, headings, images, internal links), SERP Visualizer, and head-to-head analysis with the competitors to rank on SERPs.
Genie Chat #
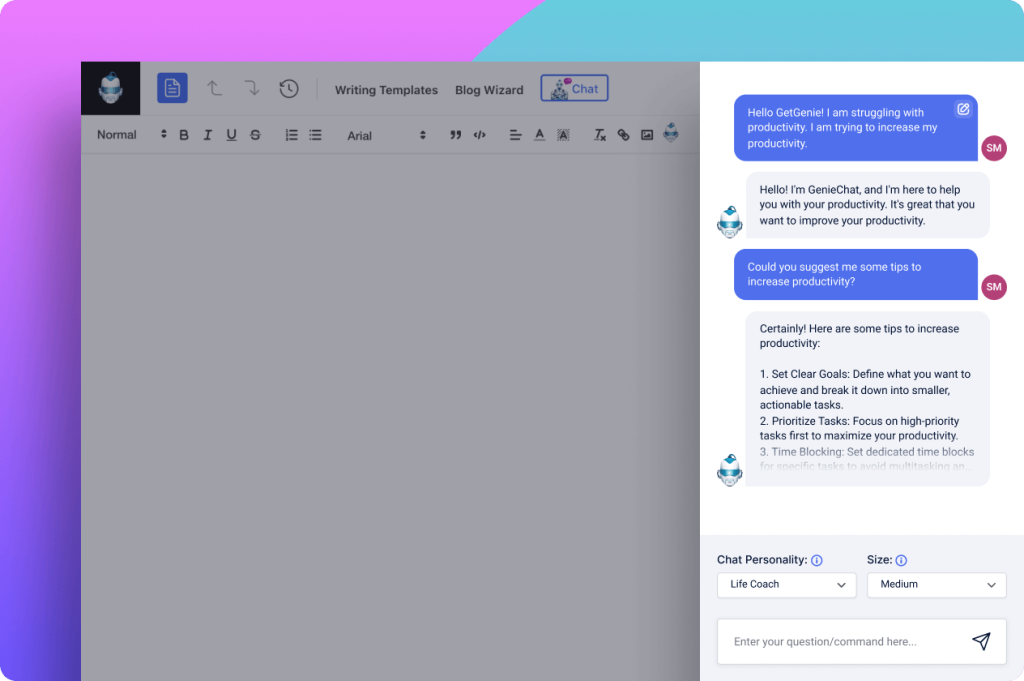
The Genie Chat button is also available in the top menu of the Playground interface. You will get 22+ chat personalities for different personalities. Like, Pro Salesperson, Travel Guide, Email Copywriter, etc.
Finally you can use the assistance from GetGenie and save time to generate high-quality content for your website.


