

How to Write an Article Using AI Blog Post Writer
A few days back, the burning question was “Can you rely on AI content writing tools for content”.
Now everyone knows the answer is yes. Even Google won’t mark AI content as spam if the information is original and useful for the users.
But the big question now is “Can I use AI to write blog posts?” The great news is “Yes.”
Among so many AI tools for blog writing, GetGenie can write a complete article for you with proper research and SERP analysis. These will help in fast and useful content creation as well as speed up your business growth.
In this write-up, I will show how to write an article using AI blog post writer (GetGenie) more efficiently.
So, let’s get started…
- What is an AI Blog Post Writer?
- How to Use an AI Blog Post Writer to Write a Complete Blog
- Step 1: Install and Activate GetGenie
- Step 2: Create a New Blog Post & Navigate to Blog Wizard Template
- Step 3: Do Keyword Analysis and Generate a Title
- Step 4: Write an Engaging AI Generated Blog Intro
- Step 5: Do a Competitor Analysis and Create a Proper Outline
- Step 6: Add a Relevant Description to Each Heading
- Step 7: Polish your Blog Content
- Step 8: Optimize Content for Search Engines
- A Little Bit More about GetGenie: The Best AI Blog Writer
- FAQ's
- Final Words on Blog Writing AI
What is an AI Blog Post Writer?
An AI blog post writer is powered by Artificial Intelligence that uses Natural Language Processing (NLP) to write blog content. However, blog post writing AI tools can also do competitor analysis and keyword research to write a complete blog content for you.
For this, you are required to provide some input like the title or keywords, then an AI blog writer produces a blog post based on the instructions.
Sounds fascinating, right?
Let’s move on to the next section to find out how to write an article with AI.
Want to learn more about AI copywriting?
Check out 👉 how to use AI to generate copy based on the AIDA copywriting model
How to Use an AI Blog Post Writer to Write a Complete Blog
Here is an 8-step tutorial on how to write a complete article using the GetGenie blog wizard:
Step 1: Install and Activate GetGenie
The first step is to install an advanced AI writing assistant “GetGenie “. This AI content writer features a blog wizard using which you can generate a complete post in a few moments like magic.
Note: If you need help installing and activating GetGenie, then check this documentation.
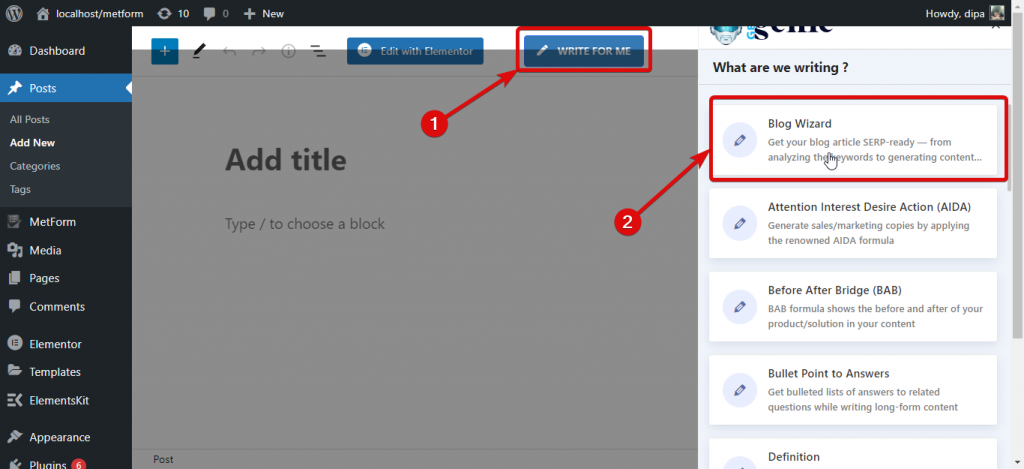
Step 2: Create a New Blog Post & Navigate to Blog Wizard Template
- Go to Dashboard ⇒ Posts, then click on Add New to create a new blog post.
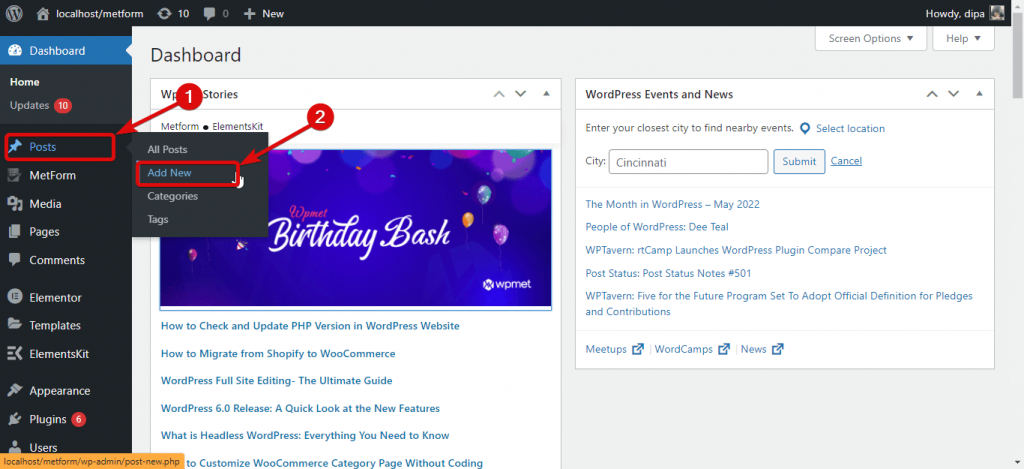
- Now, click on the “Write For Me” button. Then click on the “Blog Wizard” template.
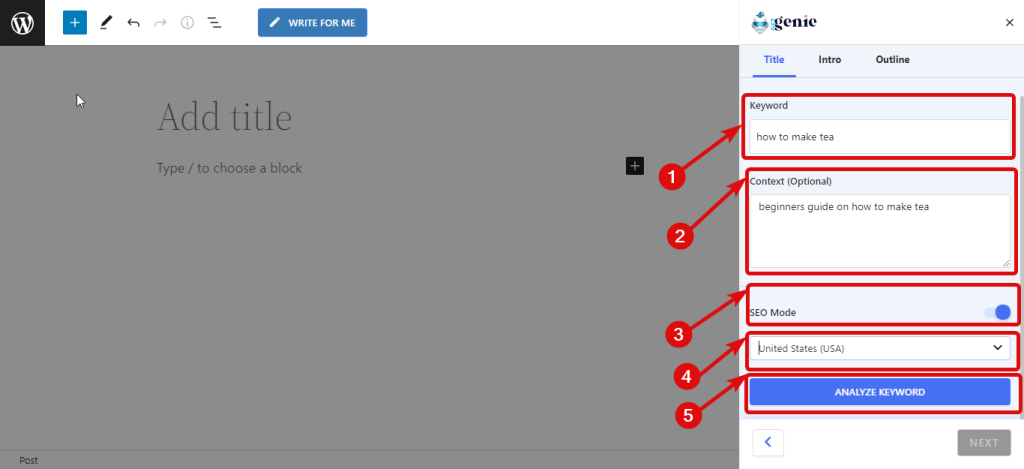
Step 3: Do Keyword Analysis and Generate a Title
Now let’s use the Keyword Analyzer feature of GetGenie to do keyword research for the blog. Before you can do keyword analysis, provide the following inputs:
- Keyword: Provide the keyword you want to write
- Context: Here you can provide the context of the blog you plan to write, though it’s optional
Next, turn on the SEO mode and from the drop-down choose the region. Then click on Keyword Analyzer.
Now you will see an extended tab with the information related to the keyword you provided. You will get to know the Search Volume, Competition, related topics, and CPC of the given keyword.
Besides, you will also get to know the search volume for the last month, the average of the last 12 months, as well as the highest and the lowest values.
Below that you will find the Search Volume trends and Google trends for the keyword.
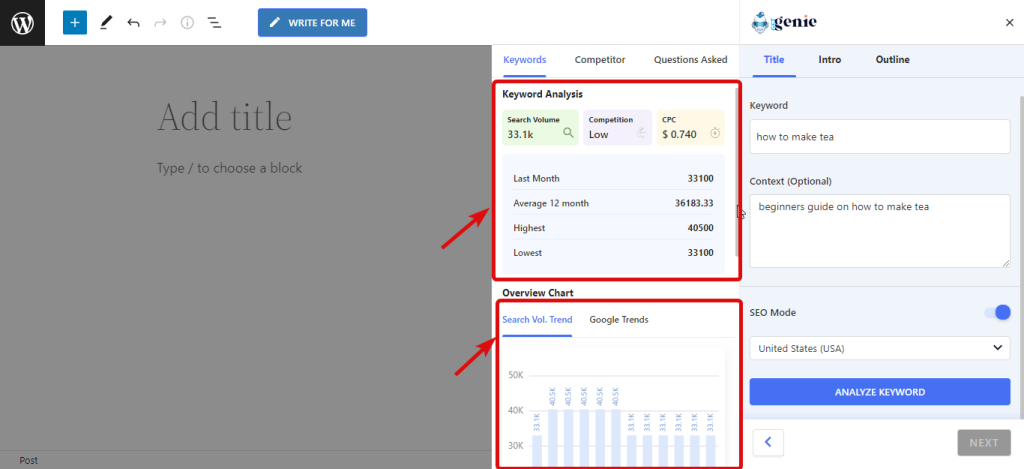
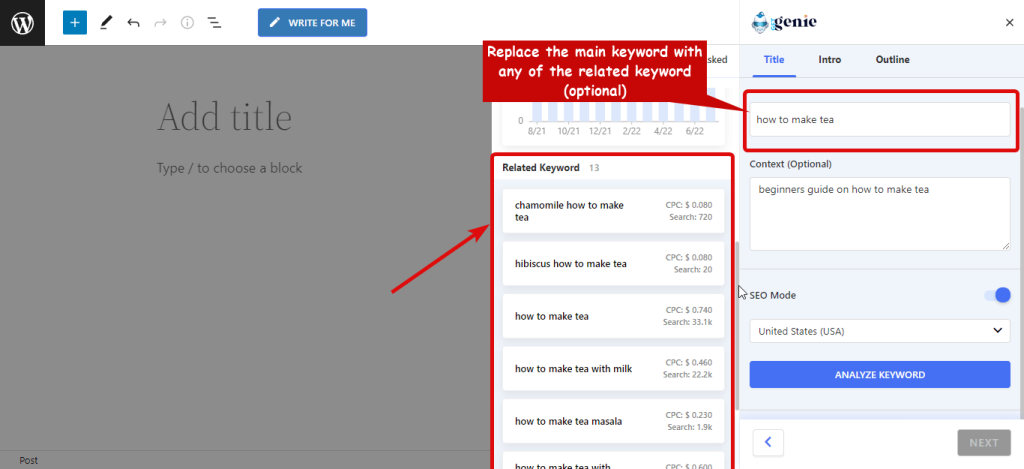
If you scroll down a little, you will find many related keywords of your given keywords with their CPC and search volume.
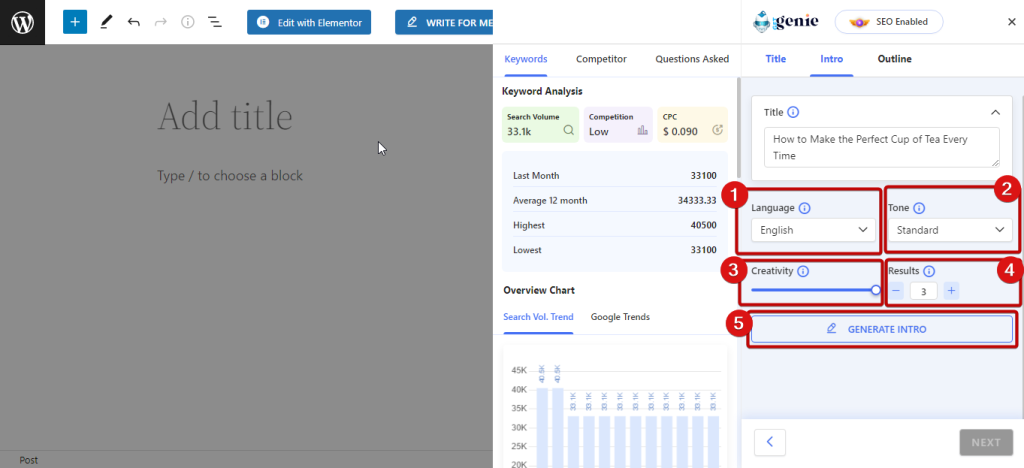
Now choose the language, writing tone, creativity (up to 5), and results (up to 6).
The “Creativity Level” will decide how creative the results will be and the “Set Result Limit” will determine the number of title ideas that will be generated.
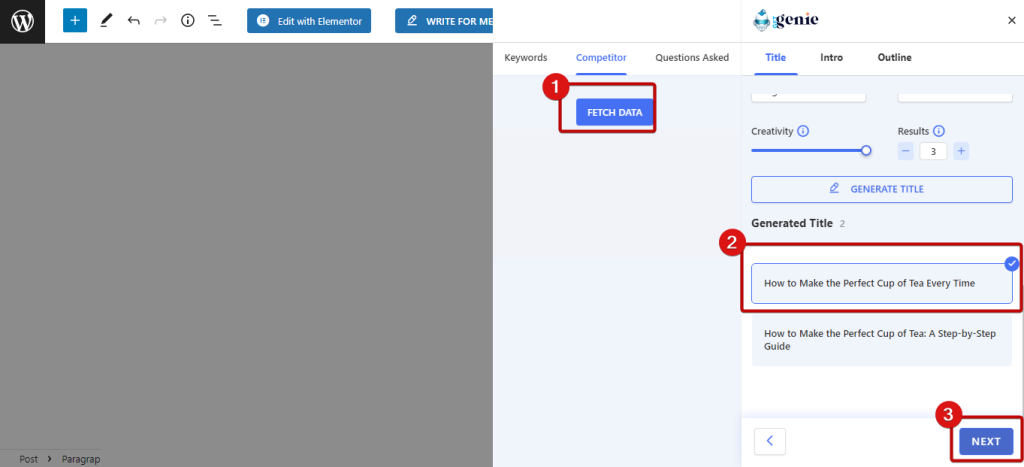
- After providing the inputs, click on “Generate Title”.
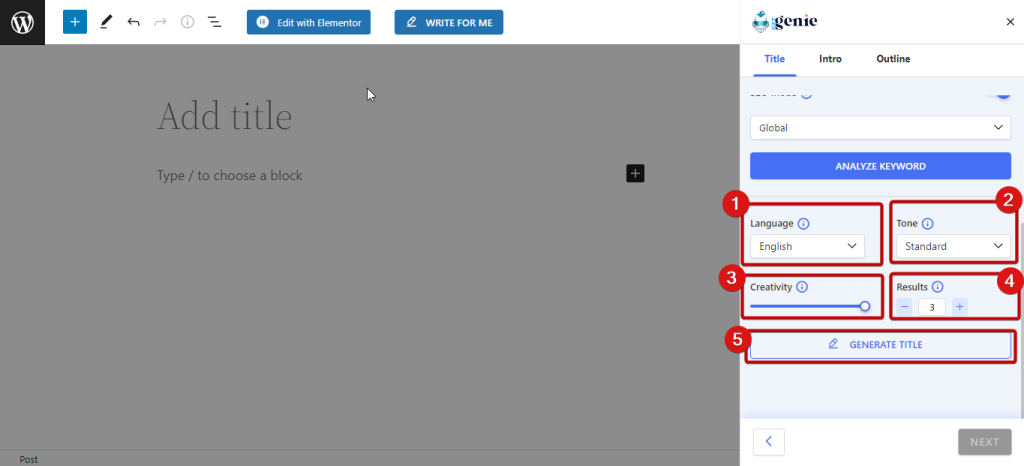
- Once the titles are generated, click on the title you like to choose and then click on Next.
Step 4: Write an Engaging AI Generated Blog Intro
For any blog article, an engaging intro is a must. And, GetGenie can help you to accomplish this.
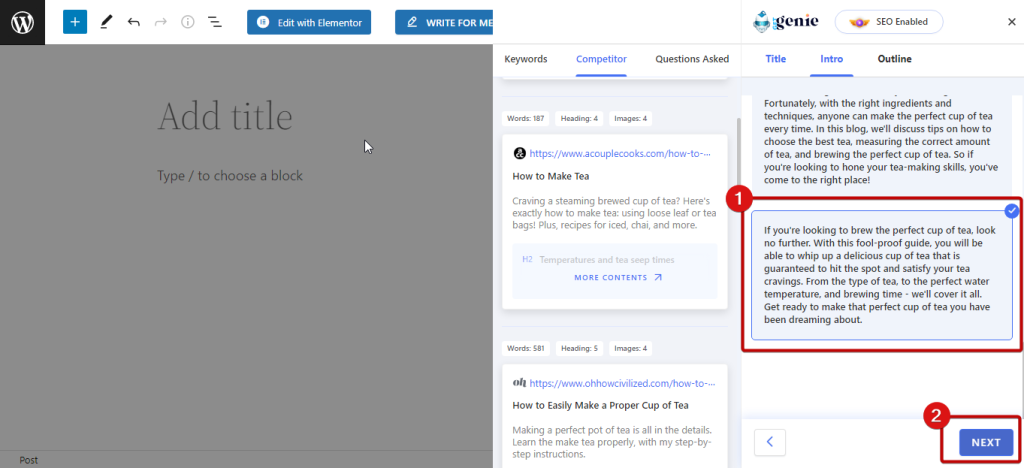
- You will see the title you choose is already added in the title box.
- Choose a creativity level, and set the result count
- Click on “Generate Intro” to produce the intro options
To choose any of the intro, just click on it. Also, you can like or dislike the generated output.
- Click on the “Next button” to go to the next step.
Step 5: Do a Competitor Analysis and Create a Proper Outline
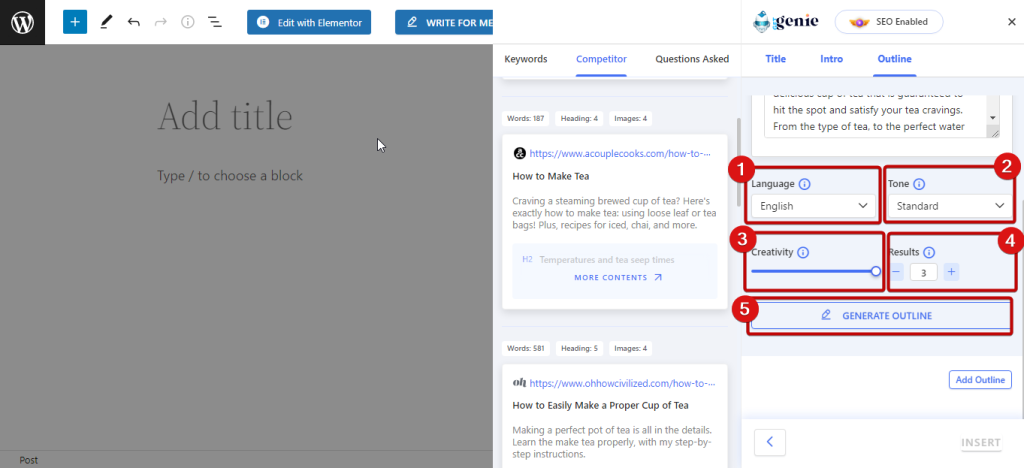
Now you should see that both the intro and title have been added. You can again set the creativity level, writing tone and result count again or keep it as it is while generating content outline.
- Click on “GENERATE OUTLINE”
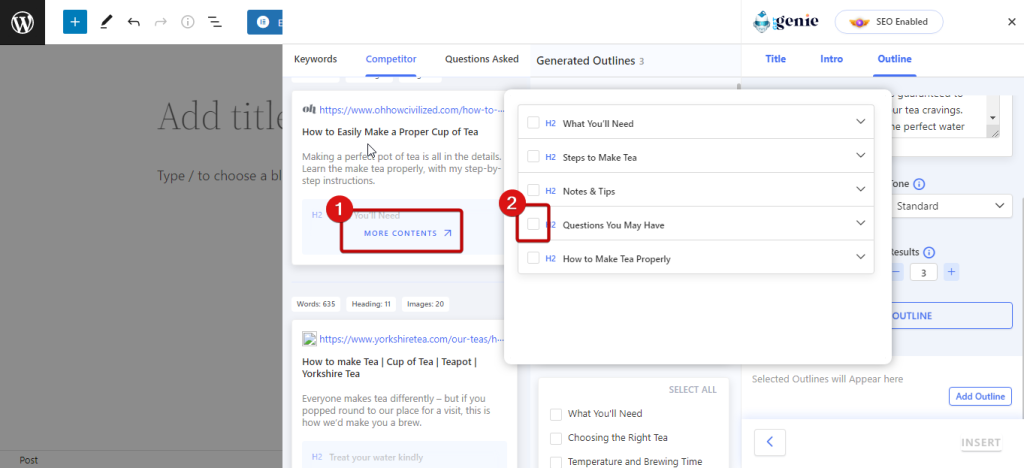
Once the outlines are generated, you can select as many options from each of them to create your custom outline or choose one whole outline from the prepared ones.
- Select the check box located by the side of each outline
- To choose a complete outline, click on “SELECT ALL”
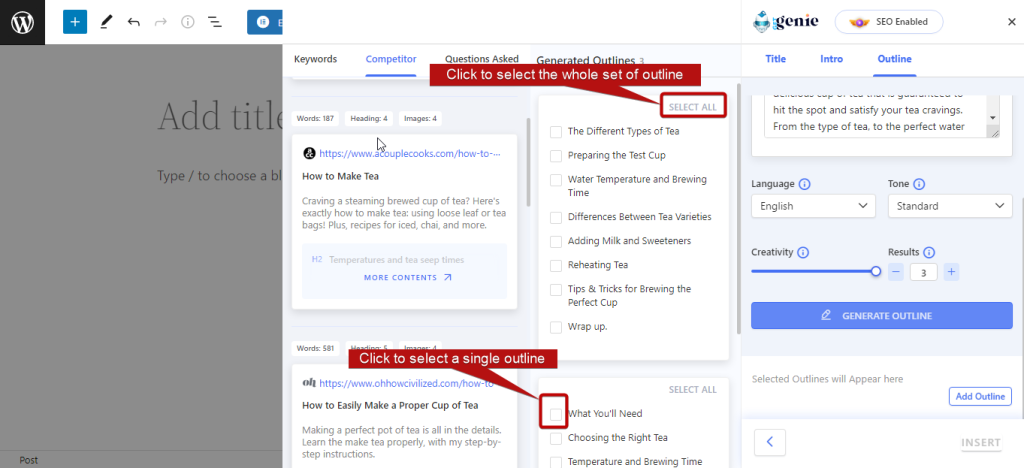
Impressively, you can add outlines from your competitor’s outline as well.
- To do so, click on the “More Details” option
- Click on the check box of any of the headings to add to the selected outline
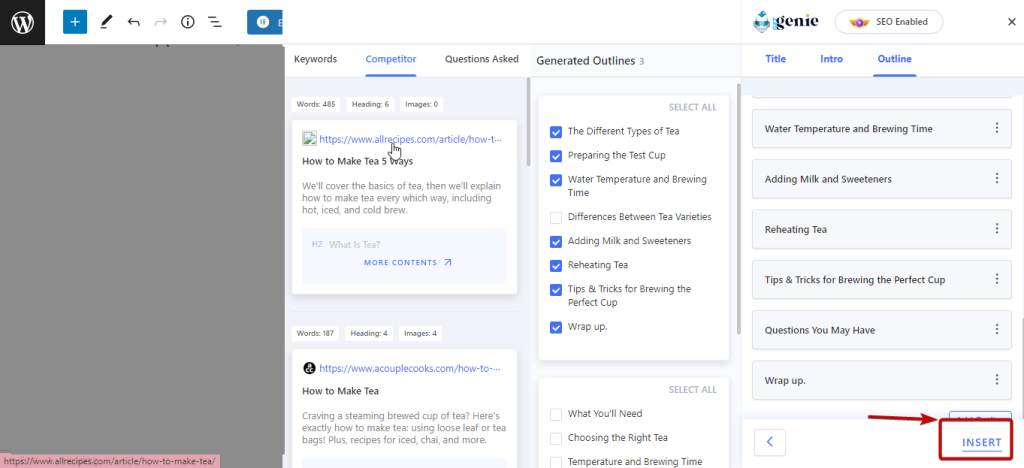
In addition, you can also manually add a new heading to your outline.
- For that, click on the “Add Outline” button in the bottom-right corner
- Once a new tab opens, write down your heading and click “Enter” to add to your outline
Now if you feel like adding or deleting the headings you added to your outline, you can do that as well. To edit/delete any of the outlines click on the three dots and choose the action you want to take.

- Finally, click on Insert to add your blog title, intro, and outline to the blog post.
Step 6: Add a Relevant Description to Each Heading
Now that you have your outline ready, all you need is content for each heading to complete the blog. To generate content for the headings:
- Select the outline/heading
- Click on the GetGenie icon
- Click on “Expand Outline”
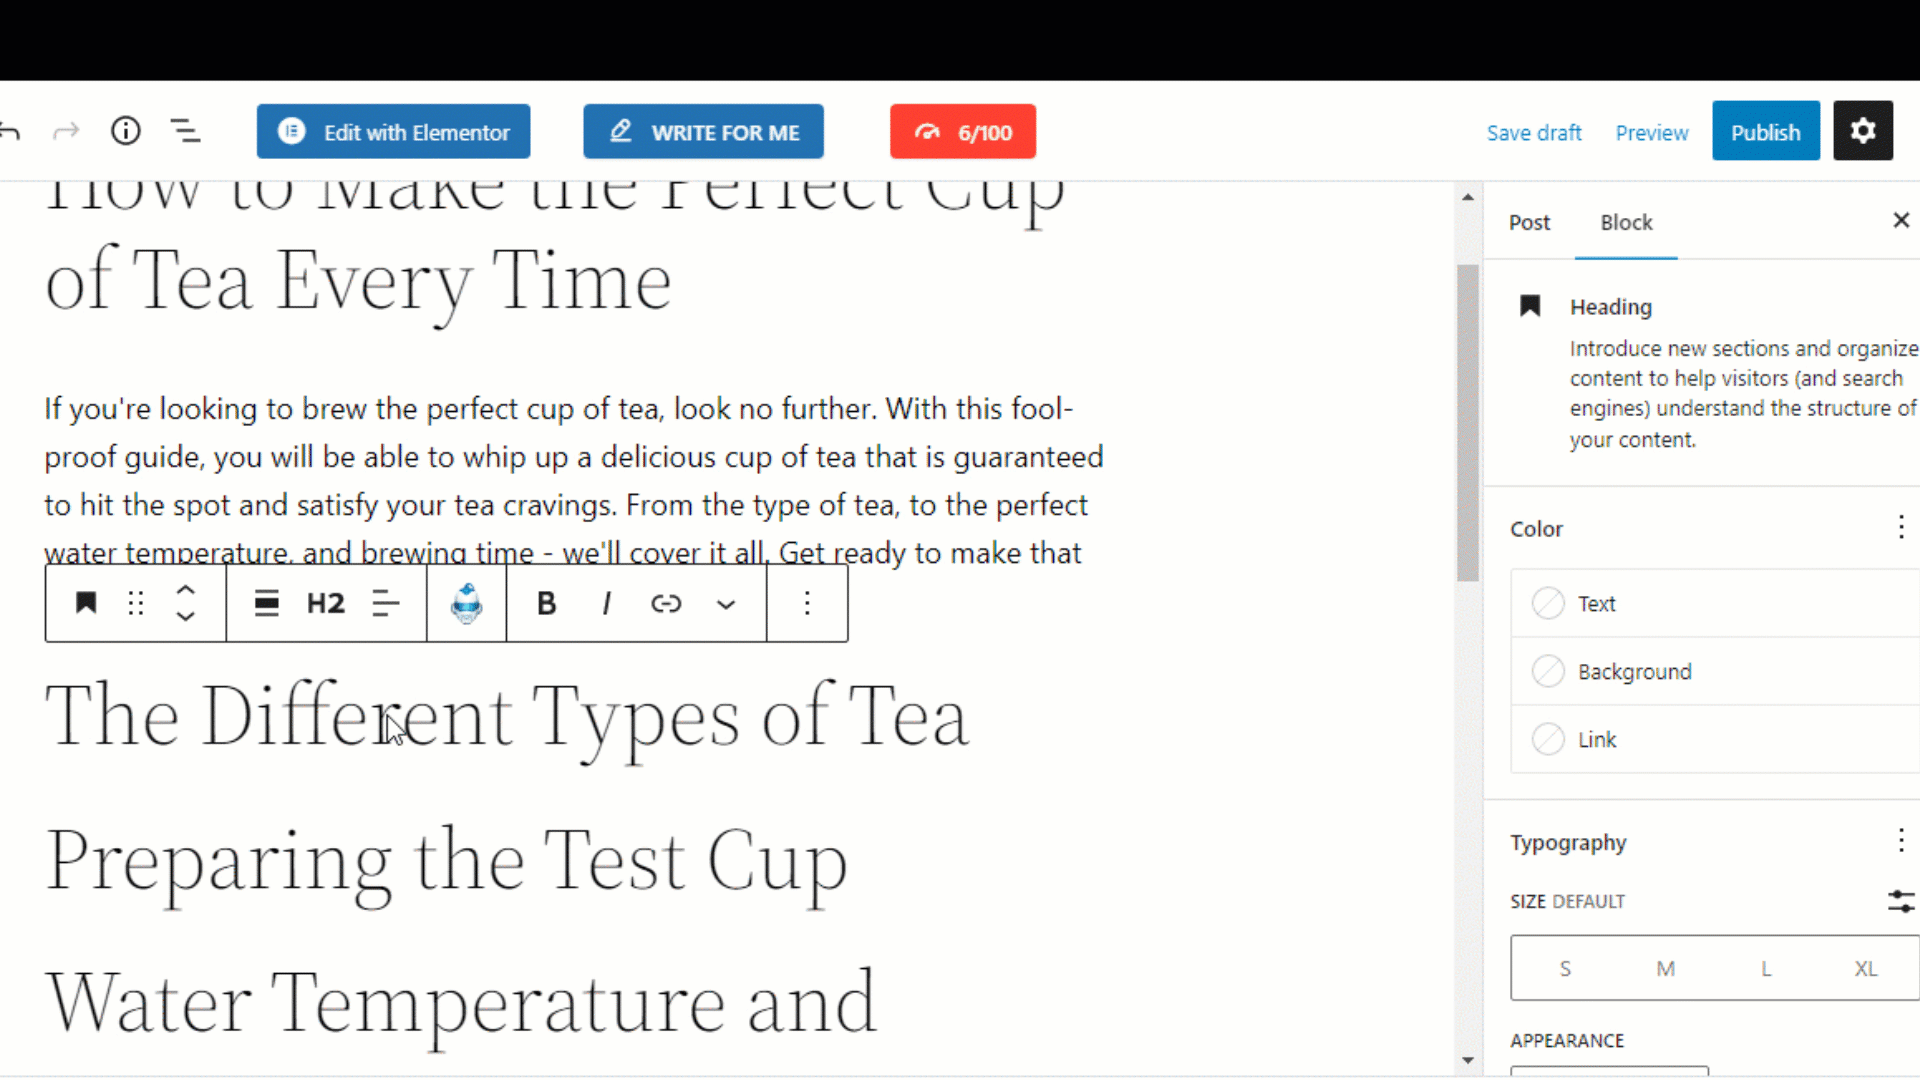
- Once you get the result click on the (+) icon in the top right corner to add the content to your ai generated blog post.
- You can repeat the steps mentioned above to generate a complete AI-written blog for all your heading.
Step 7: Polish your Blog Content
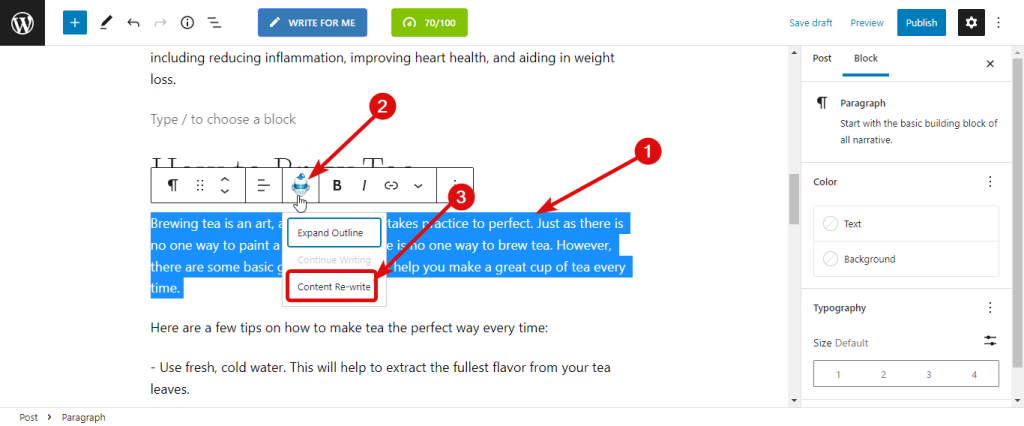
Now you have AI writing blog posts, therefore, there is a chance you may want to tweak a few things. But how? Is it possible for AI-generated blog posts? The answer is Yes, GetGenie has a rewriting feature too for AI-written articles.
You can easily change any paragraph to replace it with a new one or add a new paragraph to an already existing paragraph with GetGenie.
To rewrite a section using an AI content generator GetGenie, you need to:
- Select the whole paragraph
- Click on the GetGenie icon
- Now, click on “Content Rewrite”
Now if you want to add additional content to a paragraph you need to
- Put the text cursor on the location you want to add new content
- Click on the GetGenie icon
- Click on “Continue Writing”
You can use these 2 methods to customize and polish AI-generated content.
Step 8: Optimize Content for Search Engines
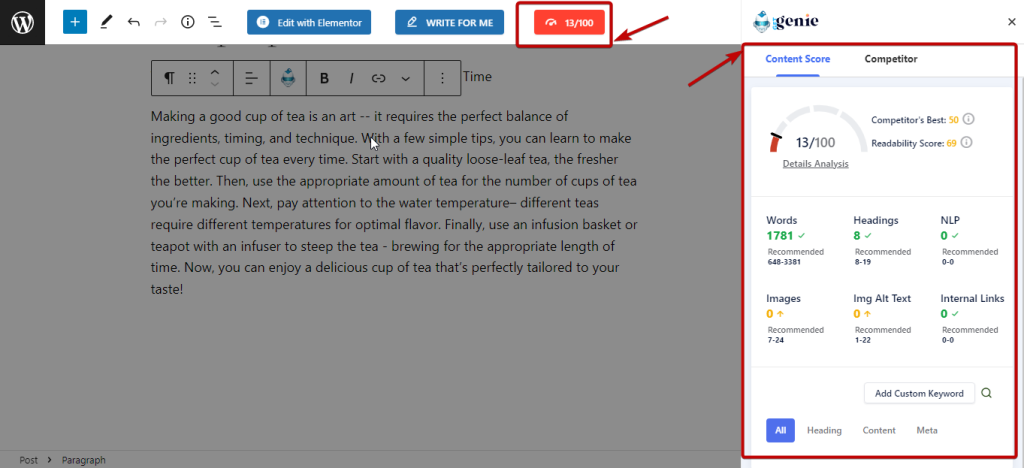
Last but not least- optimizing your blog post for Search Engines is one step that you can not afford to ignore. Because ranking on the SERP to get traffic to your blog is the ultimate goal.
In that case, GetGenie helps you to SEO-optimize your blogs as well. Well, for that also GetGenie provides an SEO score (out of 100). Not only score but once you click on the score (on top), you will also find recommendations for :
- Words
- Headings
- Images
- NPL
- Image Alt Text
- Internal Links
For more details on how to structure a blog post that ranks!
If you optimize your blog according to the recommendations by GetGenie, you will get a good SEO score and will be on your way to ranking on the SERP.
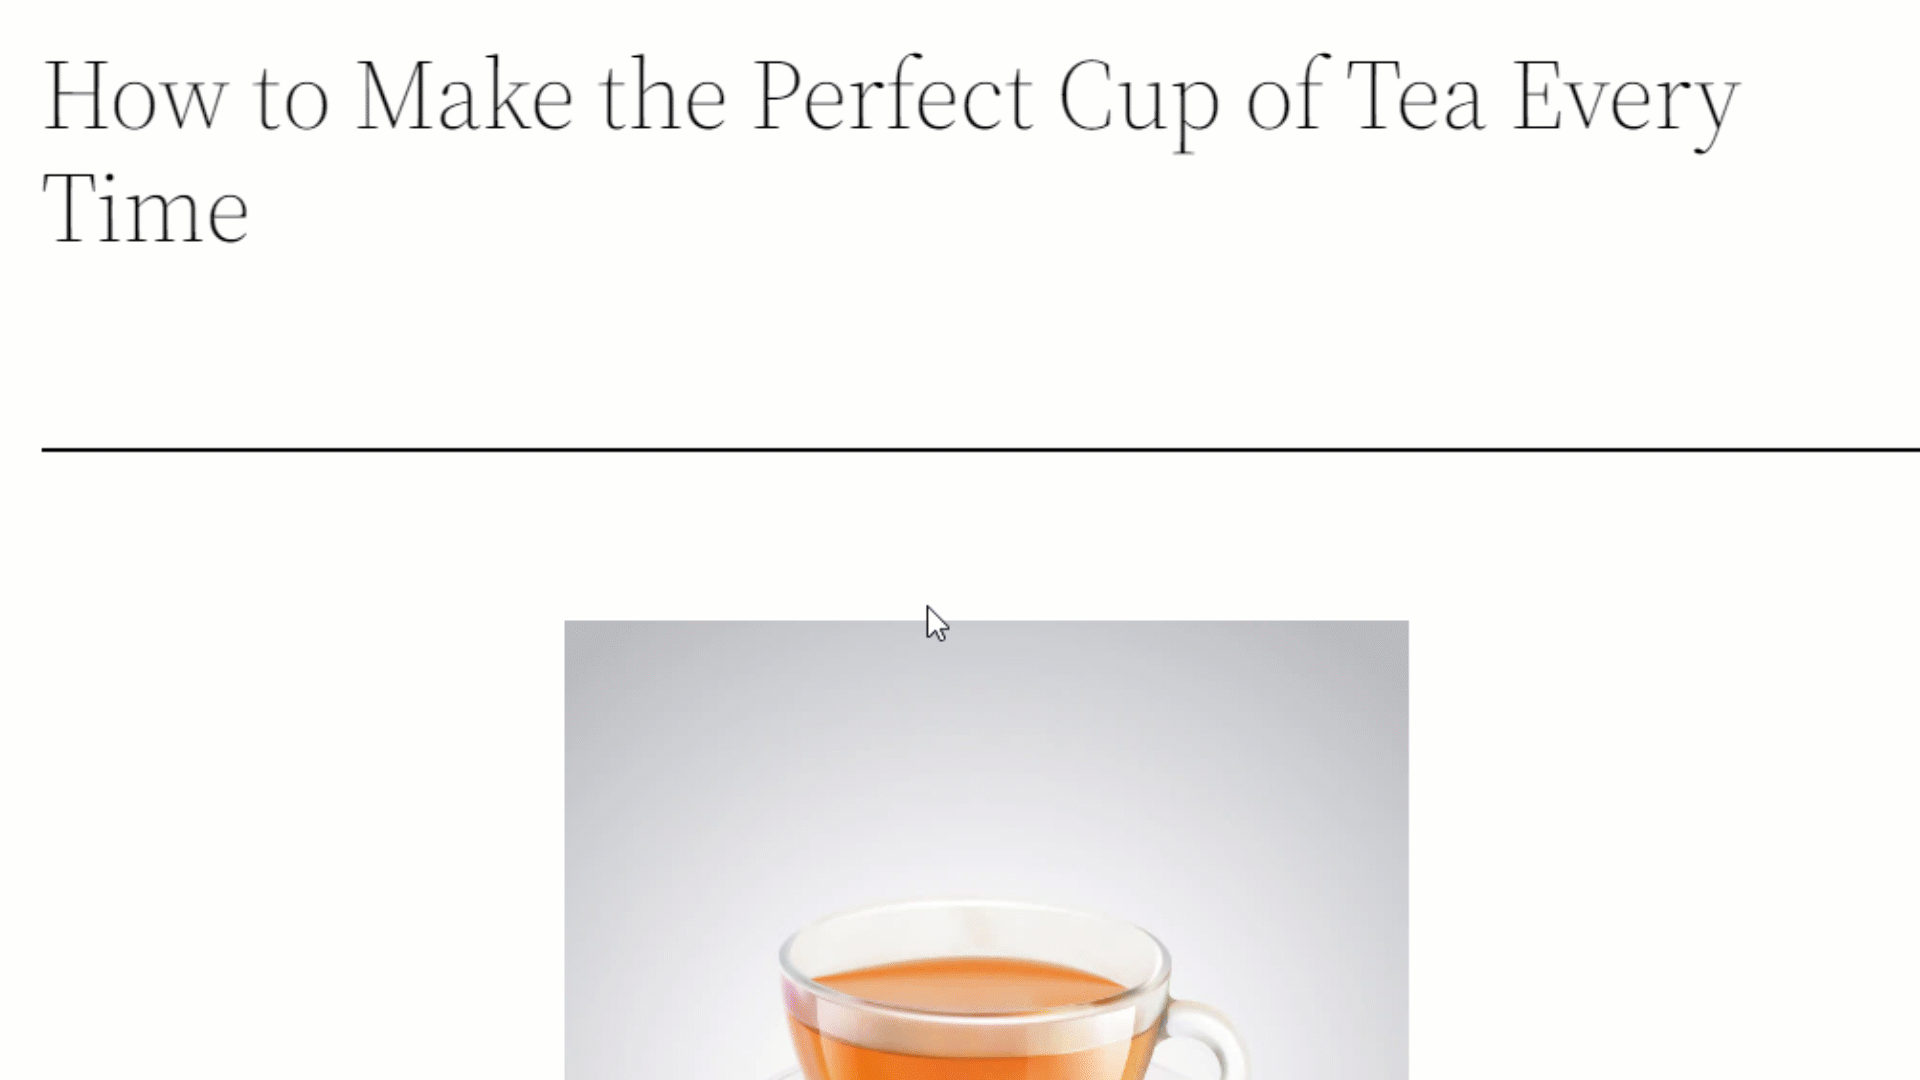
That’s it, once you are done optimizing your blog you can publish it. Here is a preview of the blog I generated:
A Little Bit More about GetGenie: The Best AI Blog Writer
Now you must have realized, that there is a blog writing AI that you can trust and that is GetGenie.
GetGenie is undoubtedly the best AI blog writer available in the market because its blog writing wizard offers all the options you need to come up with an engaging, informative, and SEO-friendly blog.
When compared to its competitors, just like Jasper AI, GetGenie stands out the most. The table below shows why GetGenie is the best option for your writing needs.
| Feature | GetGenie AI | Jasper AI |
|---|---|---|
| WordPress Plugin | Yes | No |
| SEO Focus | Strong, built-in keyword & competitor analysis, head-to-head comparison, and etc. | Only through integrations |
| Pricing | Generally more affordable | Generally more expensive |
| WooCommerce Tools | Yes, with specific templates intended for WooCommerce. | General templates |
| Number of Templates | 37+ | 50+ |
| Creative Writing | Stronger, with different writing templates | Strong, with storytelling templates |
| Chatbot | GenieChat | Jasper Chat |
| Multilingual Support | 33+ languages | 25+ languages |
On top of being fantastic and the Best AI writer, this amazing tool provides 37+ writing templates that you can use to generate any sort of marketing content you possibly need to grow your content marketing strategy.
Some of the templates that GetGenie offers include:
- Landing Page Copies
- Product Descriptions
- Headlines/Taglines
- Social Media Copies
- Email Copies
- Video Scripts
- Fictional/Non-Fictional content
To get a human-like natural conversation with the Ai chatbot, try our advanced GenieChat. With 22+ chat personalities, it will effectively answer all of your queries
FAQ‘s
Final Words on Blog Writing AI
Good job! Now you know how to use AI to write blog posts.
It is quite easy, isn’t it?
And what is even more important is that it takes way less time to write a blog post using a content writing AI than to write one from scratch.
However, you should always keep in mind you must make the final call. So, whenever you write an article using blog writing AI, do the necessary customization and alterations to polish it.
To do so, GetGenie is the best AI blog writing tool you can ask for to research, write and optimize a blog in a few minutes.
So, do try out this amazing AI blog post writer!

3 Comments
[…] 👉👉 How to Write an Article Using AI Blog Post Writer […]
very good contents, thank you
One of the most compelling aspects of AI for blog writing is its ability to generate ideas, suggest topic angles, and even assist in creating outlines. The algorithms analyze vast amounts of data and trends, empowering us to tap into niche markets and deliver content that truly resonates with our audience.
Moreover, AI can help in polishing our writing, ensuring flawless grammar, impeccable structure, and adherence to our chosen writing style. It acts as a virtual writing assistant, elevating the quality of our work and ensuring we present our ideas in the most impactful way possible.